Monday, December 19, 2011

Day 5: Road Trip Paper Clips

The 12 Crafts of Christmas
DAY 5: Road Trip Paper Clips


These are a really great idea for members of the family who are traveling with kids. How they work is, you put the paper clips, One for each child on your sun visor while you drive. If one of the children doesn't behave, you take their paper clip down. Whoever still has their paper clip up at the next rest stop will get to pick out a treat!


These are made for my sister Sara. She has 3 beautiful daughters, Ella, Olivia, and Avery. They live in California and are coming all the way to Utah for Christmas this year! Hopefully these will help make the long drive a little more enjoyable.


These are really easy to make! And a great way to use those Paper scraps that EVERYONE has tons of haha. I used paper scraps, sticker scrapbook letters, extra ribbons and lace, and some simple paper clips, and hot glued them all together!

Friday, December 16, 2011

Day Four: Crayon Monogram

The 12 Crafts of Christmas
Day Four: Teacher Monogram

 
So I know this isn't a monogram. I was originally going to try something that I had seen on pinterest, but wanted to do something more original. So of course I did a heart and my moms name in the middle. She is an awesome kindergarten teacher and maybe she can put this in her classroom.
  

I used 2 packs of 24 crayola crayons, which were $1.25 each, then organized them into the color scheme I wanted.


I lined them up and decided to do a cut out heart. So place the crayons how you want them in the finished frame.


 First, cut out a heart, you can really do any shape,and trace the pattern onto the crayons with a sharpie. Make sure that the crayons stay as still as possible while you trace. When your done it should look something like this:

  
 In hindsight, I should have made the edges of my heart not go so far to the edge of the crayons, because it gets hard to cut.

   
Next, cut the crayons on the line you drew. Place back in and trim to make sure the shape is forming correctly. After this, I decided on a background paper, and did the lettering myself. I really wanted to use a cricket but my sister in law took it back haha dang! someday I will have a cricket of my own....or even better a silhouette!


That's how it turned out! I hope my mom likes it (: But this can also be a really great Christmas gift for your kids teachers

Thursday, December 15, 2011

Day Three: Coasters

The 12 Crafts of Christmas
Day Three: Coasters


These are really easy, and so great because you can customize them to go with whatever colors your rooms are. These were my favorite. Best color combination ever in my opinion: blue, white and brown.
  This is all you need! Scrapbook paper, or burlap, mod podge, small felt surface protectors, and tiles from the home depot or lowes. These can be really cheap, clear down to 12 cents per tile! But at home depot, they sometimes have samples that are freeeeeeee!! 


(1) simply mod podge the paper or fabric onto the tiles


(2) stick four felt surface protectors on each corner of the tile


You have cute customized coasters!

Wednesday, December 14, 2011

Day Two: Sugar Scrub

The 12 Crafts of Christmas
Day 2: Sugar Scrub

   I Love this recipe. It made my skin so smooth! So easy too.
 I've got to give a shout out to Tawny Caldwell, she had this recipe on her blog and did it really cute! to see her blog go to tawnyleigh.blogspot.com 

The recipe is so simple! Only 4 ingredients:

(1) 2 cups sugar
(2) 1 cup salt
(3) 1 cup sunflower oil (buy this at wal-mart. I went to a health food store and it was $8, but at walmart you get twice as much for $4)
(4) 12 drops your choice flavor of Essential oil (The recipe says 12 drops, but I put almost the whole thing in mine! ) 
The essential oils I used were sugar cookie (fantastic!) and cinnamon, so that they would smell a little christmas-y


Simply mix all the ingredients together with a wooden spoon, and then put into the container of your choice! If it seems a little dry, don't worry because as it sits, the oil will rise to the top. If you make it too oily, then the next day the whole first inch of the container will be oil. If it does end up looking too oily, feel free to add more sugar.

I used mason jars for this demo, but the one I am actually giving away was a container from bath and body works that I had saved haha. So start saving those! They are so useful and well designed.I made a stencil with paper and painted a mason jar. Then wrote on it with sharpie.


All done! One last tip: this recipe also works wonders for dry lips! but for lips I just did the sugar and oil and scrubbed my lips, and they are now silky smooth!

Day One: Pom Pom Earrings

The 12 Crafts of Christmas
DAY 1: Pom Pom Earrings 
The original idea for this craft was as a necklace, using an existing necklace as the base. I did earrings instead, using a quarter for the base. I also used a penny for the base of the smaller ones.

The only supplies I used were: Fabric scraps, yarn ($3), a hot glue gun, two quarters ($0.50) and a pack of 42 earring findings from wal-mart ($2)
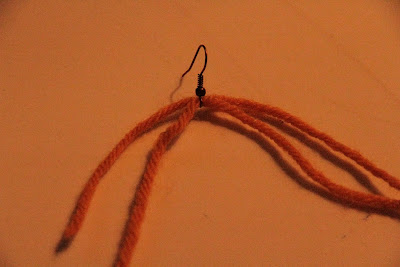
I used braided yarn to connect the finding to the pom pom. First thread the yarn through the hole of the finding then with the other end, thread it through again. There will be one 2 ends and a loop on the other side. Tie one of the loose ends into a knot, and put a small dab of hot glue before you tighten the knot so that it stays better.

 Next cut the loop so that there are three pieces attached to the finding, Braid, and hold the braid with a dab of hot glue. (The end will be hidden, so you won't see the hot glue.)


Next, to make the base of the pom pom, cover the quarter or penny in the fabric your using for you pom pom. Or, you can also hot glue yarn to cover it, but that's a little more labor intense.

 Choose which size you want your earrings, and trace 10 onto your fabric scrap. Just make sure you cut out inside the pen lines so you don't have pen on the edges of your ruffles, unless that's the effect you want.For fuller pom poms cut out and glue on more circles

The easiest way to fold the circle is 
1. fold it in half
2.Push fingers together to make an x shape
3. flatten x shape 
4. Pinch flattened x shape together, and it should look like this: 

 
 Then just hot glue it only your fabric covered quarter or penny.


Backing types: 


This one is simple, after you cover the penny with fabric, hot glue the yarn to it, and cover with a small bead


This backing is done by gluing the yarn braid to the back and covering with a circle of fabric


This backing is my favorite, but takes the longest. I just hot glued yarn in a spiral to the back, covering the braid.


DONE!!! SO CUTE


Feel free to comment! and I hope it was helpful! (:

Tuesday, December 13, 2011

The Twelve Crafts of Christmas


 The twelve crafts of Christmas is a craft a day until Christmas for you to make presents for family, friends, or anyone else on your list! follow it from December 13th until Christmas day to get the how to's!

I need to apologize in advance for any family or friends who see this, and who won't be suprised with their christmas gifts! Here is the craft agenda so far: 

Day 1: Pom Pom Earrings {For Your Friends}
Day2: Homemade Sugar Scrub {For Your Sister}
Day 3: Coasters {For Your Boss}
Day 4: Teacher Crayon Monogram{For Your Kids Teacher}
Day 5: Road Trip Paper Clips {For Your Siblings Traveling}
Day 6: Christmas Leg Warmers {For You!}
Day 7: 52 Reasons Why I Love You {For Your Sweetheart}
Day 8: Tie Keyring {For Your Dad}
Day 9: Chalkboard Globe {For Your Adventurers}
Day 10: Mommy Cards {For Young Moms}
Day 11: Personalized Decoration Blocks {Sister In Law}
Day 12: DIY Laptop Sleeve {For Your Tech-Y Brother}


Saturday, December 10, 2011

Cedar City Craft Fair Book Wreaths
Today me and my pal Tawny Caldwell (tawnyleigh.blogspot.com) are doing a local craft fair. I decided to post a few of the crafts that we would be selling there. A special thanks to my sister in law Ashley who helped me get some supplies. So along with the pics I'll give you instructions on how to do them yourself. Enjoy! 
I love book wreaths! I think they are fun and unique and very beautiful. There are tons of different styles too so that you can make it your own.

 This one is made to be a wall hanging more than a wreath. The form that i used was really simple and cheap: an empty ribbon spool! The taller they are the more full your wreath will be. Also when you hang it, I used a push pin and simply hung it from the hole of the ribbon spool. So the bigger the hole in the spool, the easier it will be to hang it up. Another thing that is cheaper than the foam wreaths ($5) is pipe cleaner from home depot. It is 97 cents, and strong enough to hold the pages without braking. Plus you can make 2 wreath forms with the one tube. personally I like the ribbon spools better because they are easier to hang, but if you want a wreath, with an empty center, use the pipe cleaner. The other thing you will need is a thick book you can rip up. I got mine from a local Deseret Industries. It was 50 cents for about 250 pages. Each book wreath uses about 50 pages, but it depends on how full you want it. To put it together you will need a hot glue gun.
 
Step 1: cut the top edge of the ribbon spool off so that its equal with the center cylinder. This makes it so you can form the front of the wreath with the sides easier. Also, I usually put cute scrapbook paper over the part of the ribbon spool that will face the wall, just so its a little more elegant.

Step 2: rip the book pages out and roll them into the shape you want. There are a lot of different ways; s shape, heart, circle are my favorite. This step can be pretty tedious but just roll or fold the paper to the shape you want then hot glue it so it stays. The heart wreath below I cut the time in half by after gluing the heart shape, I folded the whole roll in half. This makes the wreaths circumference smaller, but it goes by faster, and you use less paper. On this wreath I also used the pipe cleaner, so that there was space inside the center. I just hot glued a small piece of ribbon to hang it.
 

 Step 3: Gluing the pages on. This can take up to 2 hours if its a big, full wreath, but it is easier if you have an organized system. If you just start gluing them on, it will drive you crazy trying to make each side look even. So. with the wreaths I glue them on in windows. so do one bottom layer all the way around (I start with the edge that will be next to the wall) and space them right next to each other. Then build the layers just the same but in the windows of the previous layer. When I am done, I usually go back in and fill in places that need more.


Thats all folks! hope the directions were helpful!